| Main |
| Data Input |
| Research |
| Getting Started |
| Blob Detecton |
| Proposal |
Implementation
Requirements |
| Data Output |
| Class and Menu Specifications |
| Other |
| Deliverables |
|
Project 3: Feature Detection
Breast Cancer Feature Detection
Due See parts below
(points 230)
Parts of Project (see deliverables at end)
- Part 1 Research: 30 points =research and class discussion contributions (Oct. 10 your posting and Oct 14 your reviews
)
- Part 2 Proposal: 15 points = blob detecton and feature extraction proposal (Oct. 16)
- Part 3 Final: 185 points implementation, testing and documentation using Leveled
Grading Fomula (Nov. 11)
You will create a breast cancer blob and
feature detection system that has a GUI interface. It will read in an image and perform feature detection on it. An XMLtext file will be output as well as the the information will be displayed to the user in a window of the program that lists all of the blobs and their features detected. Details are below.
Data Input
JPG images from the USF database. You should be able to load each image and display
it and then process it. (Tip: you may want to use parts of your system from Project 2 to get you started)
Research Phase and Class Discussion (+30 points of 200 total)
You are to do research online and also using the ACM library portal to find resources (papers, web sites) that document in significant detail (you need to be able to write code from what is described) on the topic of Feature Detection/Extraction for Breast Cancer Detection. Post to our blackboard discussion board "Project 3 - Research Postings"
- (+3 pnts for each reference) You MUST post 5 such UNIQUE resources on the Discussion Board called "Project 3 Research Sharing". This will be looked at by your fellow classmates.
- (+3 pnts for each review) You then MUST read 5 other postings by OTHER students. You then are to make a minimum 2 paragraph review of the resource describing the pros and cons and any comments / questions you have on implementation of the feature extracton ideas.
Blob-detection (2 cases ) and Features for Blobs..... to Get you Started (but you must find evidence in literature for them)
Some of the literature on Breast Cancer paritions finding cancer into the 2 following cases which we will concentrate on:
case 1 (masses): the detection of masses (blobs)
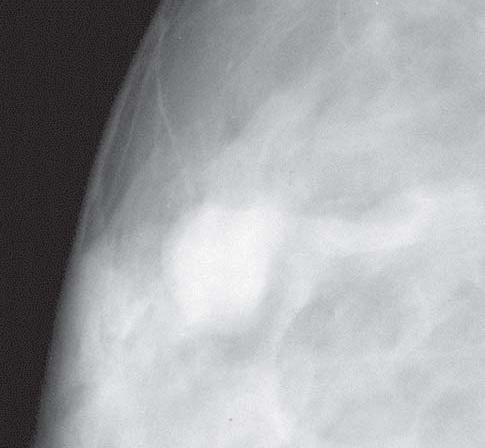 Some general reasoning in the Masses (case 1) case is that somehow (you need to read the literature) the size, location, shape, density, etc. of the Mass can say if cancer and what kind (something again I want you to read about...there are different stages of cancer as well as saying no cancer-benign). You may find some other unique research looking at some very different feauters. Some general reasoning in the Masses (case 1) case is that somehow (you need to read the literature) the size, location, shape, density, etc. of the Mass can say if cancer and what kind (something again I want you to read about...there are different stages of cancer as well as saying no cancer-benign). You may find some other unique research looking at some very different feauters.
case 2 (micro-calcifications): detecting small (much smaller than the masses) micro-calcifications (mini-blobs).
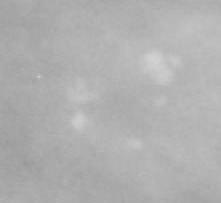 Some general reasoning in the micro-calcifications (case 2) case is that somehow the number, distirubtion, density, location, etc. of the micro-calcifications can say if it is cancer and what kind. However, you may find other theories looking at shape, etc of these tiny blobs...you do the research. Some general reasoning in the micro-calcifications (case 2) case is that somehow the number, distirubtion, density, location, etc. of the micro-calcifications can say if it is cancer and what kind. However, you may find other theories looking at shape, etc of these tiny blobs...you do the research.
Given our 2 cases ....here are some features you might think about. IMPORTANT: note that with each you must first find a potential mass or the microcalcifications. So, that blob detection comes first before you extract the features/attributes of each blob (or mini-blob). Here is a directory XXXXXX with some papers I am giving you to get you started. You CAN NOT use these as your 5 references you post.
Here are some ideas you might see (and hopefully you will see much more) in your 5 research references and each of your classmates 5 references(remember we are sharing and commenting on ).
For Cancer Represented as Masses (blobs)
First must do Blob detection (via thresholding or segmentation or ....) then for each Blob collect following attributes/features of the blob
- shape of blob - taken from boundary of blob
- texture inside blob
- size of blob
- boundary shape - smooth versus spurious
- density (intensity)
|
For Cancer Represented as Microcalcifications (small tiny blobs)
First must detect and label mini-blobs (via thresholdig or segmentation or...) then collect the following feature information (note in this case the blobs may be too small for shape analysis done with masses)
- number in image
- distribution of in ROI
- shape
- size
- density/variance
|
Blob Detection and User assissted ROI option.
I am assumming that you will be first doing Blob detection in your breast image (if you propose something different you need to convince me of it and it will need to be approved). This blob detection algorithm is part of the work of this project. To make things easier, I will allow you to require the user to first signify an area of interest, which we will henceforth call Region of Interest (ROI), by in your applications GUI window containing the image lettting the user with their most click and drag to create a rectangle. This area the must be displayed separately as the active image (in essence cropping) and then you can do the processing on this. The idea is that the user has assisted with indicating a smaller area that might contain a blob. This can significantly make your blob detection easier with simpler methods. It is not required that you do the ROI option. It is a tradeoff between some GUI programming and making a more complex algorithm to detect blobs.
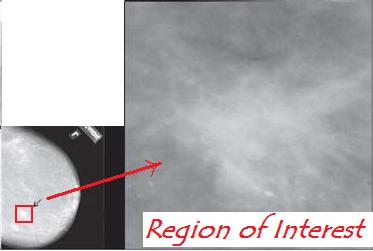
Here we see the user
with their mouse specifying
the region of interest- red
rectangle - that is then shown on right. This is the image that will now be processed by the system.
Blob Detection and Feature Extraction Proposal (+15 points)
Given your research and participation in class discussions you are to propose how you are going to detect blobs in your image and if you are going to use the ROI feature. You must also propose for each blob (or sets of mini-blobs in the microclassification case) the 5 features you want to use and a brief description on how you will implement both the blob detection algorithm and feature extracton algorithms. Your proposal must contain psuedo code (at a high level) and have the following sections:
- Secton 1: Mass Case - Blob Detection Algorithm
- Section 2: Mass Case - Features Extraction Algorithms (5) for Blobs
- Section 3: Micro-calcification Case - (mini) Blob Detection Algorithm
- Section 4: Micro-calcification Case - Feature Extracton Algorithms (5) for mini-Blobs
System Implementation Requirements
Determining Mass or MicroCalcification Case and Program Use Cases
Your program will read in a JPEG image (or partial image...as they are very large) from the images in the USF database. Images may or may not have cancer in them (you should test both). Then the user can select a menu option Process->Feature Detect (or alternatively Process->Masses AND Process->Microcalcifications) which will run your blob detecton and 5 different feature detection algorithms.
In Either Case the results will be:
- After Blob Detecton will have a Vector (data sructure in java) of Blobs found in the image (for either masses or micro-calcification cases). This vector is calls BlobList and contains instances of the class Blob. This vector will be stored in an instance of the class called CancerAnalysis shown below.
- Based on the size and/or number of blobs you need to decide if you are going to process for case 1 (masses) or case 2 (micro-calcifications). YOU may alternatively have to menu options Process->Mass Detection and Process-Microcalcifications instead of the single Proces->Feature Detect mentioned below.
- CASE 1: Mass Analysis:
- Blob class (as described more below) will contain minimum of 5 Feature objects f1, f2, f3, f4, and f5 hat are instances of your own implemented sub-classes (Feature1, Feature2, etc) of the class Feature below.
- CASE2: Microcalcification Analysis:
- depending on what features you propose, you may have features belonging to each blob like in case 1 then:
- Blob class (as described more below) will contain minimum of 5 Feature objects f1, f2, f3, f4, and f5 hat are instances of your own implemented sub-classes (Feature1, Feature2, etc) of the class Feature below.
- AND/OR you may have features belonging to the ROI that look at global features between blobs like their relative distribution, density, number, location, etc. In this case you will use the class CancerAnalysis object to not only contain the BlobList but, also these global features cases. These features are called gf1,gf2,gf3,gf4,gf5 and are instances of the classes GlobalFeature1, GlobalFeature2, etc. that are sub-classes of the class Feature you are to create.
- Creation of a n XML file that contains the entire Blob instances in BlobList formatted in XML as described below, called Blobs.xml, that is stored in the same directory as your executable code.
- With the List menu, there are the option List->Blobs. The option List->Blobs will display the nicely formated XML for all of the blobs in a scrollable window.
Data Output (Blobs.xml file)
The Blobs.xml will contain in the following XML formatted information an example shown below.. Note the items in red do not appear in the file and are only there for description.
<CancerAnalysis>
<image filename="XXX"> XXX here is the input filename
<width>WWW</width> WWW is width in pixels
<height>HHH</height> HHH is height in pixels
</image>
<numBlobs>NNN</numBlobs> NNN is number of blobs detected
NOW you will have NNN instances of <Blob>...</Blob> for the NNN blobs found
<Blob>
<feature1>
<name> descriptive name of feature</name>
<location>row,colum</location> row,column is location (center or start) of this feature
<area> ZZZ</area> either bounding box information or list of pixels
that belong to this feature
<certainty> PPP </certainty> PPP=0 to 100% , certainty of this feature
<importance> SSS</importance> SSS=0 to 1 , level of importance.
<info1> XXXXXX</info1> make up XML describing YOUR feature
<info2> XXXXXX</info2> make up XML describing YOUR feature
<info3> XXXXXX</info3> make up XML describing YOUR feature
YOU may name 5 or 1 or 20 pieces of info describing YOUR feature1
</feature1>
<feature2>
<name> descriptive name of feature</name>
<location>row,colum</location> row,column is location (center or start) of this feature
<area> ZZZ</area> either bounding box information or list of pixels
that belong to this feature
<certainty> PPP </certainty> PPP=0 to 100% , certainty of this feature
<importance> SSS</importance> SSS=0 to 1 , level of importance.
<info1> XXXXXX</info1> make up XML describing YOUR feature
<info2> XXXXXX</info2> make up XML describing YOUR feature
<info3> XXXXXX</info3> make up XML describing YOUR feature
YOU may name 5 or 1 or 20 pieces of info describing YOUR feature1
</feature2>
<feature3>
<name> descriptive name of feature</name>
<location>row,colum</location> row,column is location (center or start) of this feature
<area> ZZZ</area> either bounding box information or list of pixels
that belong to this feature
<certainty> PPP </certainty> PPP=0 to 100% , certainty of this feature
<importance> SSS</importance> SSS=0 to 1 , level of importance.
<info1> XXXXXX</info1> make up XML describing YOUR feature
<info2> XXXXXX</info2> make up XML describing YOUR feature
<info3> XXXXXX</info3> make up XML describing YOUR feature
YOU may name 5 or 1 or 20 pieces of info describing YOUR feature1
</feature3>
<feature4>
<name> descriptive name of feature</name>
<location>row,colum</location> row,column is location (center or start) of this feature
<area> ZZZ</area> either bounding box information or list of pixels
that belong to this feature
<certainty> PPP </certainty> PPP=0 to 100% , certainty of this feature
<importance> SSS</importance> SSS=0 to 1 , level of importance.
<info1> XXXXXX</info1> make up XML describing YOUR feature
<info2> XXXXXX</info2> make up XML describing YOUR feature
<info3> XXXXXX</info3> make up XML describing YOUR feature
YOU may name 5 or 1 or 20 pieces of info describing YOUR feature1
</feature4>
<feature5>
<name> descriptive name of feature</name>
<location>row,colum</location> row,column is location (center or start) of this feature
<area> ZZZ</area> either bounding box information or list of pixels
that belong to this feature
<certainty> PPP </certainty> PPP=0 to 100% , certainty of this feature
<importance> SSS</importance> SSS=0 to 1 , level of importance.
<info1> XXXXXX</info1> make up XML describing YOUR feature
<info2> XXXXXX</info2> make up XML describing YOUR feature
<info3> XXXXXX</info3> make up XML describing YOUR feature
YOU may name 5 or 1 or 20 pieces of info describing YOUR feature1
</feature5
</Blob> |
...........REPEAT for the other NNN-4 BLOBS !!!!! ...............
</CancerAnalysis> |
Note that when calculating each feature, you will not only specify
it but, also give an certainty metric on a scale of 0 to 100% indicating
how true this feature is. Finally, for each feature you will give a metric on a scale of 0 to 1 indicating the importance of this feature. There is no right or wrong way to calculate certainty and importance but, should make some common sense for your feature.
- Feature Certainty = this metric should be calcuated automatically by the program and a function of the certainty of the pixels used in its calculation. The certainty of a pixel represents the certainty that a pixel belongs to the tumor under consideration instead of belonging to the non-tumor or background part of the ROI. Think creatively about how you could come up with certainty (i.e. the variance of a metric being smaller could be said to make it more certain).
- Feature Importance = this metric may be calculated automatically but, when this is not feasible can be determined by a human operator. In the later case, the feature, its location, its value should be given in a pop-up box and a prompt for a "feature importance" value from 0 to 1 requested of the operator as their input. You can be creative and rule based in saying something is important (i.e.as an example consider looking at the shape of the boundary of the mass as a feature if certainty > 80 and shape feature value > 2 then is very strong indicator of this cancer thus important is high = 1.0).
Program Data Classes and Menu Specifications
(you are required to use these names and structures). NOTE: you may choose to add more elements to these classes....they are not necessarily complete but, contain some beginning ideas to get you started and keep you structurd.
FeatureDetectionProgram
Name of class that is the main program for Feature Extraction
|
Menus of FeatureDetectionProgram
- File->Open: opens image to be processed. Loads data into class ActiveImage (see Project 2 specifications)
- File->Save As: saves the current image into a user specified location (see Project 2 work you did)
- File->Exit: exits the program
- Process->Feature Detect OR (Process->Masses AND Process->Micro-calcifications): runs the blob detection and then the approriate feature detection algorithms (5) on each blob producing BlobList which is vectors containing instances of Blob. Also, saves Blob.xml XML file
- List->Blobs : displays BlobList in a nice format in a window (scrollable) in the program
|
CancerAnalysis Class Psuedocode (for both Masses and Micro-calcifications)
This is a class that contains the BlobList and references to the Image as well as any global features for the micro-calcification class. For the Masses case it may be that you have no global features. NOTE: depending on YOUR proposal you may have say only 3 global features and 2 blob features for your handling of the Micro-calcification case. Another student could have 5 global features and 0 blob features for their handling of the micro-calcification case. This could also (though ver unlikely) be true for the Masses case (there typically would have 5 features for each blob and not use the global features). So, there is some variability here in the number of Global Features.
class CancerAnalysis{
ImageClass image; //pointer to the Image being processed
Vector BlobList; //vector containing instances of Blob class
GlobalFeature1 gf1; //global feature 1 -probably only filled with
// real data for micro-calcifications case.
GlobalFeature2 gf2; //global feature 2 -probably only filled with
// real data for micro-calcifications case.
GlobalFeature3 gf3; //global feature 3 -probably only filled with
// real data for micro-calcifications case.
GlobalFeature4 gf4; //global feature 4 -probably only filled with
// real data for micro-calcifications case.
GlobalFeature5 gf5; //global feature 5 -probably only filled with
// real data for micro-calcifications case.
} |
Blob Class Psuedocode (for both Masses and Micro-calcifications)
note: in micro-calcifications case you may have instead of features (or can have some) that belong to each blob only the global features that belong to CancerAnalysis class.
NOTE: depending on YOUR proposal you may only use these 5 features for your Masses case. However IF YOU DO have blob-specific features (i.e.) for Micro-calcifications, you need to alter this code to have additionally the MicroCalcificationFeature1 mf1, and MIcroCalcificationFeature2 mf2; So your proposal will determine if there are more than 5 features located here.
class Blob {
int ID; //unique ID indicating this blob
Location location; //indicates location
Area area; //indicates area feature encompasses
Feature1 f1;
Feature2 f2;
Feature3 f3;
Feature4 f5;
//add any blob-specific features for MicroCalcification here.
} |
Feature Class Psuedocode
class Feature {
String name; // descriptive name (i.e. texture
Location location; //indicates location
Area area; //indicates area feature encompasses
int certainty; //number from 0 to 100
float importance; //indicates importance from 0 to 1.0
//method to return XML formated information:
void to_XML(int i){
String s = "<feature" + i + ">";
//you finish the rest to produce xml as described previous...
//this method only returns name, location, area,certainty, importance
}
//method to return String formated information:
void to_String(int i){
String s = "Feature " + i + ": " + this.description;
//you finish the rest to produce nice string for display in program...
//this method only returns name, location, area,certainty, importance
}
|
Feature1 Class Psuedocode (will have similar for Feature2,Feature3,Feature4 and Feature5)
class Feature1 extends Feature {
//now add your own pieces of info that describes THIS feature-
//
i.e info1,info2, info3 you saw above in the XML
........
//constructor
Feature1() {
this.description="XXXXX";// you fill in
//whatever else you need in your constructor
}
//method to return XML formated information..
//return as a string to print out or use javax.xml
String to_XML(){
super.to_XML(1); //calls parent method
//you create XML for YOUR feature 1
}
//method to return String formated information:
String to_String(){
super.to_String(1); //calls parent method
//you create String for YOUR feature 1
}
//other methods you need???
} |
Location Class Psuedocode
class Location {
Point Start, End; //may have a start location and end location
Point Center; //may have a center location
void setStart(int row, int col) {
this.Start.x = row;
this.Start.y = col;
}
void setEnd(int row, int col) {
this.End.x = row;
this.End.y = col;
}
void setCenter(int row, int col) {
this.Center.x = row;
this.Center.y = col;
}
//add methods as you wish like get*() methods
} |
Area Class Psuedocode
class Area {
Point UpperLeft, LowerRight; //locations of bounding box
int width, left; //dimensions of bounding box
Vector Pixels; //create vector of Point object that are
//given array of Point objects representing pixels Point.x = row,
//Point.y=column in this area set them in Pixels array
setPixels(Point PointArray){
for(int i=0; i<PointArray.size(); i++)
this.Pixels.add(PointArray[i]);
}
|
Note: reuse ImageClass you created in Project 2.
IMPORTANT: add 2 methods to the ImageClass you created called
//if using ROI - then add location and dimensions of the ROI here
//method to return XML formated information..
//return as a string to print out or use javax.xml
String
to_XML() {
/*compose string that looks like
<image filename="XXX"> XXX here is the input filename
<width>WWW</width> WWW is width in pixels
<height>HHH</height> HHH is height in pixels
</image>
*/
}
String to_String() {
///your code to return image info in a formatted string
}
|
FeatureDetectN class Psuedocode (will have FeatureDetect1, FeatureDetect2, FeatureDetect3, FeatureDetect4, and FeatureDetect5)
//THIS is for blob-specific cancer detection (i.e. for sure the Masses case)
class FeatureDetect1 {
Feature1 f1; //vector of Feature1 instances
//your algorithm goes here
Feature1 detect(Blob b){
f1 = new Feature1(".....");
//your algorithm goes here
return f1;
}
}
|
GlobalFeatureDetectN class Psuedocode (will have GlobalFeatureDetect1, GlobalFeatureDetect2, etc. depending on your proposal)
//THIS is for the micro-calcification class (possibly masses depending on proposal)
class GlobalFeatureDetect1 {
GlobalFeature1 gf1;
//your algorithm goes here
GlobalFeature1 detect(CancerAnalysis c){ //doing for entire BlobList in image
gf1 = new GlobalFeature1(".....");
//your algorithm goes here
return gft;
}
//method to return XML formated information..
//return as a string to print out or use javax.xml
String to_XML() {
super.to_XML();
//see above for illustration of XML.but,YOU need to
//make up the xml tags for this Feature 1 and the
//information will be particular to the features choose.
}
}
|
Some Labs Doing Research in this area (much more)
PAPERS
CONSIDERATONS
- Convert images to JPEG (use batch program)
- Design Architecture/ Class structure
- Develop ROI extrator GUI ?
- Feature 1: Area
- Feature 2: Shape
- Feature 3: Spiculation- Stellate Pattern?
- Feature 4: Texture
- Feature 5: Boundary Sharpness (Margin Sharpness)
- Feature 6: Boundary Irregularity-Measure of Smoothness (same
as feature 5???....related to feature 3)?
Implementation Details
You will select a supervisor from your group to monitor progress on
the project. Ev.eryone must partcipate in all phases of this projects.
Also, EVERYONE must be able to understand and reproduce the code created
if necessary. If you do not individually complete the portion of the
work allocated to you as stipulated by the supervisor, you will not
be given credit on that phase of the project AND this work must then
be redistributed by the supervisor to the rest of the class.
Attendance throughout the class periods we will work on this
project is CRITICAL and NECESSARY for credit on this project. ONLY
absences excused by written doctor reports or other accepted excuses
(see instructor) will be allowed and in this case a different individual
project will be assigned to you
Deliverables (how to turn in)
- RESEARCH: This has 2 phases. one is posting and the other is review of others postings. All of this is done on blackboard's discussion board "Project 3 - Research Postings"
Phase 1: Post 5 references with your synopsis of how they blob detection and feature extraction. Each posting must have link to pdf or website link to the resource. Each reference MUST be detailed enough to be able to code the idea from reading it. You can NOT use a reference provided by the instructor. Please DO NOT POST your references until the due date.
Phase 2:
You are going to respond to 5 posting made by other student(s). Pick those of interest to you and give your synopsis of this work and your opinion on its merits.
- PROPOSAL PHASE : This is where you will be posting your proposal for system (Before you implement it). This will be done on blackboard's discussion board "Project 3 - Blob Detection and Feature Extraction Proposal"
You may post as a text posting (preferable) or attached word document. The format must contain (keep section heading):
Given your research and participation in class discussions you are to propose how you are going to detect blobs in your image and if you are going to use the ROI feature. You must also propose for each blob (or sets of mini-blobs in the microclassification case) the 5 features you want to use and a brief description on how you will implement both the blob detection algorithm and feature extracton algorithms. Your proposal must contain psuedo code (at a high level) and have the following sections:
Secton 1: Mass Case - Blob Detection Algorithm
Section 2: Mass Case - Features Extraction Algorithms (5) for Blobs
Section 3: Micro-calcification Case - (mini) Blob Detection Algorithm
Section 4: Micro-calcification Case - Feature Extracton Algorithms (5) for mini-Blobs
- FINAL PHASE: Implementation and turn in of code and results. It should include 2 files turned in to blackboard discussion board "Project 3- Final"
1) zipped up (using zip standard only) file containing all code.
2) word document (see project description). This document must contain:
- Word Document (click here for template you MUST use) that details the following:
- Section 1 Execution Instructions: Instructions for me to download and run your code. YOU NEED to show me screen shots of you doing this from your uploaded blackboard code.....this forces you to make sure that I can run your code. You MUST have the following screenshots AND give description on what to do:
- screenshot 1.1 = screen shot of your files uploaded to Project 1 turn in folder on blackboard
- screenshot 1.2 = directory view of "temp" directory you unzipped file to showing the unziped files and directory structures.
- screenshot 1.3 = Eclipse running where you have opened up project file in "temp" directory.
- screenshot 1.4 = Eclipse running the application - show screenshot of it running. If I must do something beyond simply hitting the "run" button, you need to give screenshots and step by step instructions.
- Section 2 Code Descpription: A describing how code is structured and the state of how
it works.
Give a describption for each filename listed.
- Section 3 Testing: here you give screen shots of you running the various stages of the program as detailed here:
- section 3.1: loading image -
- screenshot 3.1a= pop-up file dialog box where you have selected the image you are going to load in your program.
- screenshot 3.1b= the image being viewed in your application that was just loaded.
- section 3.2: saving image
- screenshot 3.2a = screen shot of active image in your application you are going to save
- screenshot 3.2b = screen shot of file save as dialog box where you have specified a DIFFERENT name not used yet for this image.
- screenshot 3.2c = screen shot after you do an open on the image you just saved in 3.2b
- section 3.3: exit application
- screenshot 3.3a = screen shot showing application gone (really this is nothing) BUT, if the application has errors on closing I want to see this!!!
- section 3.4: thresholding (PHASE 2 only)
- screenshot 3.4a = original image you are going to threshold shown in activeimage displayed in your application
- screenshot 3.4b = pop-up dialog box asking user for threshold information, enter in the threshold value before screenshot
- screenshot 3.4c = new image after thresholding in activeimage displayed in your applicaiton.
- section 3.5: Undo Operation (done in phase 1 but, shown in Phase2)
- screenshot 3.5a = thresholded image from screenshot 3.4c.
- screenshot 3.5b = new image reverting back to unthresholded image AFTER you have selected the UNDO operation. This is the new activeimage displayed in your application.
- section 3.6: negative (PHASE 2 only)
- screenshot 3.6a = original image you are going to negate shown in activeimage displayed in your application
- screenshot 3.6b = new image after negative operation done in activeimage displayed in your applicaiton.
- section 3.7: edge detction (PHASE 2 only)
- screenshot 3.7a = original image you are going to edge detection on shown in activeimage displayed in your application
- screenshot 3.7b = new image after edge detection done in activeimage displayed in your applicaiton.
- section 3.8: contrast stretching (PHASE2 only)
- screenshot 3.8a = original image you are going to contrast stretch shown in activeimage displayed in your application
- screenshot 3.8b = pop-up dialog box asking user for input regarding contrast stretching enter in the information before screenshot
- screenshot 3.8c = new image after contrast stretching in activeimage displayed in your applicaiton.
- Section 4 Comments Optional any comments you have regarding your code (necessary if you code is not working, you need to tell me in detail what the problem is or what is missing)
- HTML paper on how you designed your Breast Cancer Feature Detection
Program. Describe your approach and why you decided to take it.
Upload HTML w/images, etc. to your server account. Post URL. YOU MUST create
your own test sequence, in addition you must test using at least 4 cases
from the database.
- Fully comment and test out program.
- Turn in USB keyfob/CDwith all java code and compiled class files needed
to run the program. IF YOU use additional classes not in standard Java,
you need to have all of the files here...make a JAR file.
- Printout of code, fully commented, with YOUR NAME ON TOP, and INSTRUCTIONS
ON HOW TO RUN THE CODE FROM YOUR USB keyfob/CD
- A one-page description of how code is structured and the state of
how it works.
- A one-page description of each persons contribution to the project.
If you have 3 people in your group this page should be formated by having
3 sections, each with a different person's name as the header. Under
each section, describe that person's contributions to the design, code,
and documentation development.
- Print outs of screen shots of program working showing the results
of: image loading and display of image sequence before and after processing.
|