|
||||||
|

STEPS to Create a simple OpenCV-centric Android application.
It will be capable of accessing camera output, processing it and displaying the result.
STEP 1: Down Load OpenCV SDK FOR ANDROID (ONLY ONCE) --http://opencv.org/releases.html
-
ALSO the book "Mastering opencv android application" goes over how to do this.
-
Here is an example of the software for version 2.4.* that is non-free http://docs.opencv.org/2.4/modules/nonfree/doc/nonfree.html
-
Here is a video showing it for 2.4.*
simply download file and unzip to a directory you will remember where it is stored
NOTE: which version do you want?? For certain a stable release --I would NOT choose the latest if it is very new.
EXTRA STEP MAY BE REQUIRED - NON-FREE APIs
(optional but, necessary to use some the the "non-free" API): More recent versions of OpenCV (since 2.4*) have moved some of the API into a separate download --because it is no longer OpenSource. An example of this is SIFT and SURF--- go here for some tips to understand how to download these separate api's and install them http://algebra.sci.csueastbay.edu/~grewe/CS6825/Mat/OpenCV/InstallNonFreeModules.html
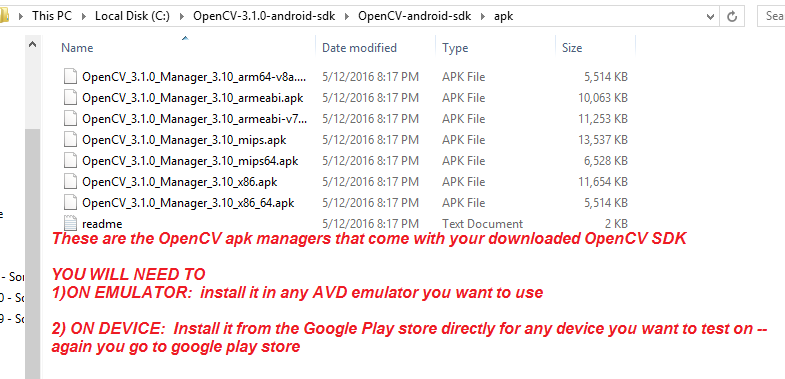
STEP 2: (ONLY ONCE) INSTALL OpenCVManager applicaton on Emulator and any Device you will use to run your own app using OpenCV
HOW to install on an EMULATOR --- first note that the location of the OpenCVManager application is inside of where you downloaded the OpenCV SDK folder. Here is where mine is located
STEP 1: NOW there are many files --which one should you use --you need to know what chipset you are running to know which one to install.
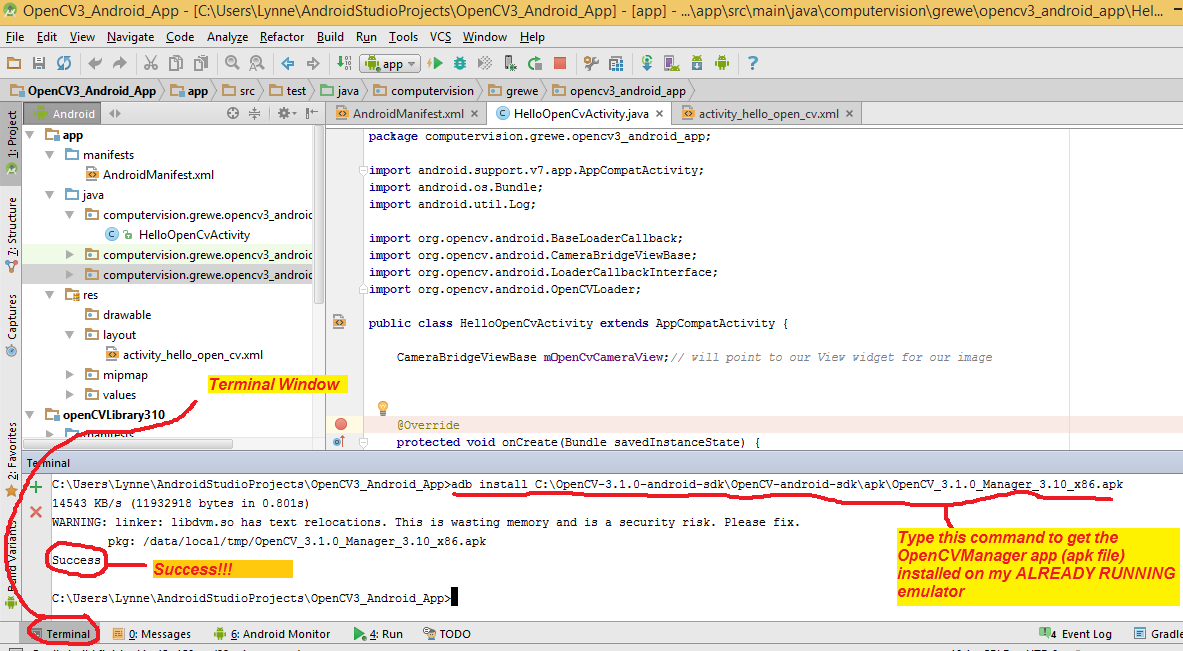
STEP 2: You must have your emulator running.
STEP 3: Go to the terminal window in android studio and type the adb command shown in image below
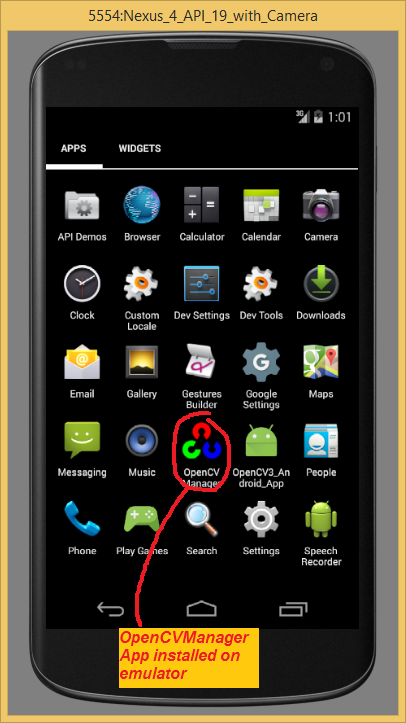
HERE IS THE RESULT
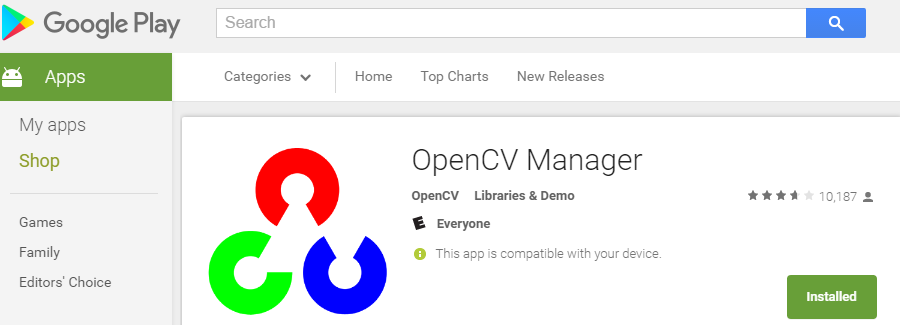
TO INSTALL ON A REAL DEVICE go to the Google Play store and install it like you would any other application
STEP 3: Create Project
Create a new clean workspace, create a new Android project File ->New ->Android Project Set name, target, package and minSDKVersion accordingly.Allow ANDROID STUDIO to create default activity. Lets name the activity HelloOpenCvActivity.
Choose Blank Activity with full screen layout. Lets name the layout HelloOpenCvLayout.
STEP 4: ADD OpenCV Module to your project
- https://www.youtube.com/watch?v=Deqe9iZ3aNc = VIDEO showing the steps below
- install OpenCV Android SDK on your machine and unzip in a location you like (not download folder)
- start Android Studio
- create new project or open existing one you want to add OpenCV to
- install OPenCV module (File->New->Import Module) select on file system C:\location install opencv\**\sdk\java AND hit Next and Finish
- PROBLEM currently with OpenCV downloaded module and how to fix------ Now it seems that the current build.gradle file (this is the file that will be used for compiling) the newly imported OpenCV module from step 4 is WRONG -- well old.
For example, mine says
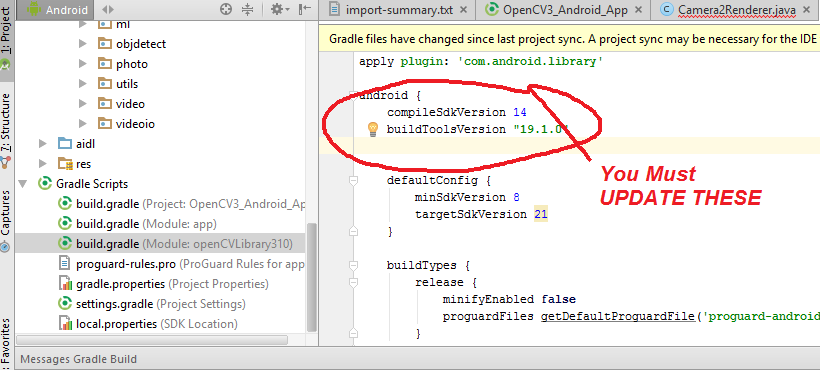
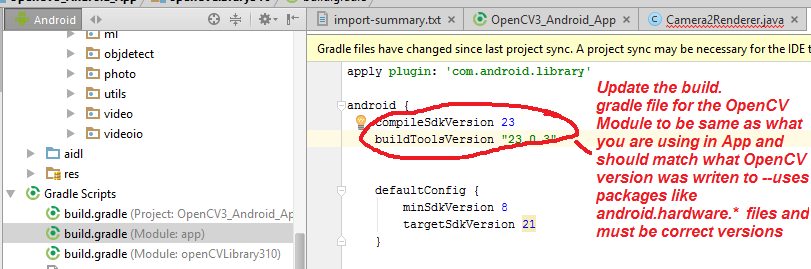
and YOU MUST CHANGE it to use the appropriate version for OpenCV as it uses the more modern Android SDK and newer classes in android.hardware.* packages.
NOW RUN PROJECT->CLEAN
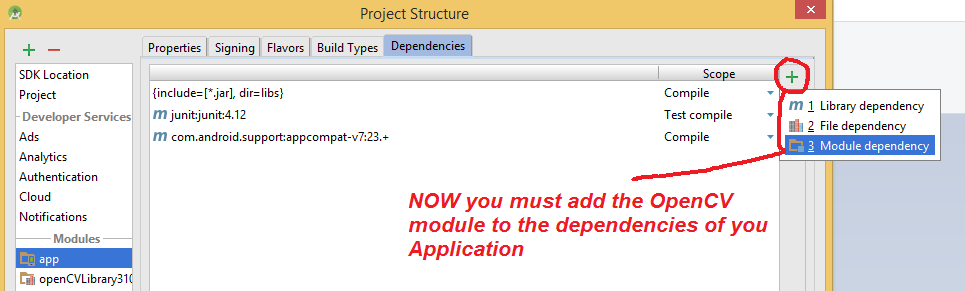
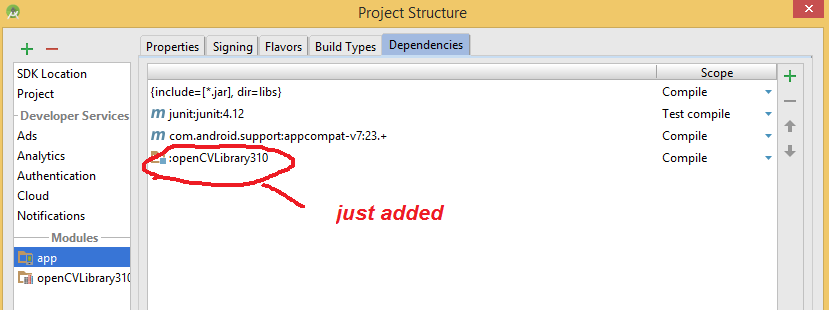
- NOW setup the app's project dependencies. Right click on app and select "Open Module Settings" will pop up the following choose dependencies and add (+) the OpenCV module you imported in step 4.
STEP 5: Start to modify your Android Application Code to include OpenCV basic code
-
Edit your layout file as xml file and pass the following layout there:
 1
 2
 3
 4
 5
 6
 7
 8
 9
 10
 11
 12
 13
 14
 15
<LinearLayout xmlns:android="http://schemas.android.com/apk/res/android"
      xmlns:tools="http://schemas.android.com/tools"
      xmlns:opencv="http://schemas.android.com/apk/res-auto"
      android:layout_width="match_parent"
      android:layout_height="match_parent" >

        <org.opencv.android.JavaCameraView
          android:layout_width="fill_parent"
          android:layout_height="fill_parent"
          android:visibility="gone"
          android:id="@+id/HelloOpenCvView"
          opencv:show_fps="true"
          opencv:camera_id="any" />

</LinearLayout>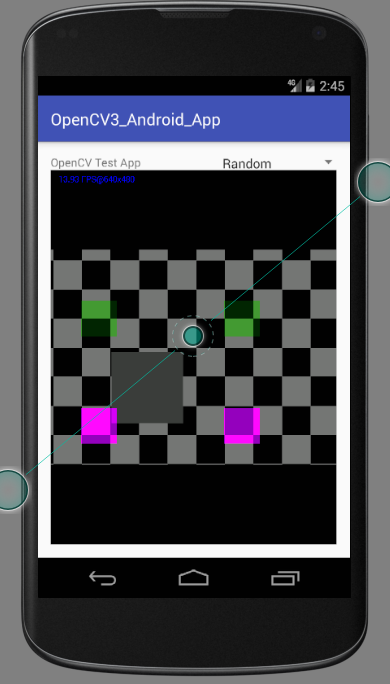
-
Add the following permissions to the AndroidManifest.xml file:
1
2
3
4
5
6
7
8
</application> <uses-permission android:name="android.permission.CAMERA"/> <uses-feature android:name="android.hardware.camera" android:required="false"/> <uses-feature android:name="android.hardware.camera.autofocus" android:required="false"/> <uses-feature android:name="android.hardware.camera.front" android:required="false"/> <uses-feature android:name="android.hardware.camera.front.autofocus" android:required="false"/> -
Set application theme in AndroidManifest.xml to hide title and system buttons. (OPTIONAL/CAUTION---ONLY IF YOU DON"T HAVE A THEME SPECIFIED YOU ALREADY LIKE)
1
2
3
4
<application android:icon="@drawable/icon" android:label="@string/app_name" android:theme="@android:style/Theme.NoTitleBar.Fullscreen" > -
Add OpenCV library initialization to your activity. Fix errors by adding requited imports.
change THIS to the version you downloaded//imports you will need at top of your Activity class's File
import org.opencv.android.BaseLoaderCallback;
import org.opencv.android.CameraBridgeViewBase;
import org.opencv.android.LoaderCallbackInterface;
import org.opencv.android.OpenCVLoader;
import org.opencv.android.CameraBridgeViewBase.CvCameraViewListener2;
//add this class variable in your Activity class
CameraBridgeViewBase mOpenCvCameraView; // will point to our View widget for our image
 1
2
3
4
5
6
7
8
9
10
11
12
13
14
15
16
17
18
19
20
21
22
23
//this code will tell us when Camera connected it will enable view private BaseLoaderCallback mLoaderCallback = new BaseLoaderCallback(this) { @Override public void onManagerConnected(int status) { switch (status) { case LoaderCallbackInterface.SUCCESS: { Log.i("OPENCV", "OpenCV loaded successfully"); mOpenCvCameraView.enableView(); } break; default: { super.onManagerConnected(status); } break; } } }; // if we need to resume this Activity will sync up with OpenCV version software @Override public void onResume() { super.onResume(); OpenCVLoader.initAsync(OpenCVLoader.OPENCV_VERSION_3_1_0, this, mLoaderCallback); } -
Defines that your activity implements CvCameraViewListener2 interface and fix activity related errors by defining missed methods. For this activity define onCreate,onDestroy and onPause and implement them according code snippet bellow. Fix errors by adding requited imports.
//alter your class statement for your Activity to add the following
public class HelloOpenCvActivity extends AppCompatActivity implements CvCameraViewListener2 {1 2 3 4 5 6 7 8 9 10 11 12 13 14 15 16 17 18 19 20 21 22 23 24 25 26 27 28 29 30 31 32 33 34 35 36
     @Override
   public void onCreate(Bundle savedInstanceState) {
       Log.i(TAG, "called onCreate");
       super.onCreate(savedInstanceState);
       getWindow().addFlags(WindowManager.LayoutParams.FLAG_KEEP_SCREEN_ON);
       setContentView(R.layout.HelloOpenCvLayout);

       //grab a "handle" to the OpenCV class responsible for viewing Image
       // look at the XML the id of our CamerBridgeViewBase is HelloOpenCVView
       mOpenCvCameraView = (CameraBridgeViewBase) findViewById(R.id.HelloOpenCvView);
       mOpenCvCameraView.setVisibility(SurfaceView.VISIBLE);
       mOpenCvCameraView.setCvCameraViewListener(this);//the activity will listen to events on Camera
    }

     @Override
   public void onPause()   {
       super.onPause();
       if (mOpenCvCameraView != null)
           mOpenCvCameraView.disableView();
   }


    public void onDestroy() {
       super.onDestroy();
       if (mOpenCvCameraView != null)
          mOpenCvCameraView.disableView();   }

    public void onCameraViewStarted(int width, int height) {   }

    public void onCameraViewStopped() {   }

   // THIS IS THE main method that is called each time you get a new Frame/Image
   public Mat onCameraFrame(CameraBridgeViewBase.CvCameraViewFrame inputFrame) {
       Mat imageMat = inputFrame.rgba();

       // now you use the Mat class to represent the Image and you can use method calls
       // like imageMat
       // make calls like to get a pixel at i,j   imageMat.get
       // double pixel[] = new double[3];
       // pixel = imageMat.get(20,10);  this wil retrieve pixel and column = 20, row =10
       //similarly can set a pixel in Mat  via imageMat.set(i,j,pixel);
       // read API on Mat class for OPenCV

       // A VERY USEFUL class to call image processing routines is ImagProc
       // This code in comments shows how to do the Sobel Edge Detection on our image in imageMat
       /*
            Mat gray = inputFrame.gray();
            Mat mIntermediateMat = new Mat();
            Imgproc.Sobel(gray, mIntermediateMat, CvType.CV_8U, 1, 1);
            Core.convertScaleAbs(mIntermediateMat, mIntermediateMat, 10, 0);
            Imgproc.cvtColor(mIntermediateMat, imageMat, Imgproc.COLOR_GRAY2BGRA, 4);

         */

        return imageMat;


}
- Run your application on device or emulator.
Lets discuss some most important steps.
Every Android application with UI must implement Activity and View.
-
ACTIVITY extends CVCameraViewListnener: By the first steps we create blank activity and default view layout. The simplest OpenCV-centric application must implement OpenCV initialization, create its own view to show preview from camera and implements CvCameraViewListener2 interface to get frames from camera and process it.
-
XML LAYOUT: Use xml layout. Our layout consists of the only one full screen component of class org.opencv.android.JavaCameraView. This class is implemented inside OpenCV library. It is inherited from CameraBridgeViewBase, that extends SurfaceView and uses standard Android camera API.
Alternatively you can useorg.opencv.android.NativeCameraView class, that implements the same interface, but uses VideoCapture class as camera access back-end. opencv:show_fps="true" andopencv:camera_id="any" options enable FPS message and allow to use any camera on device. Application tries to use back camera first.
-
ACTIVITY Class implement methods: need to implement Activity class. OpenCV initialization process has been already discussed above. In this sample we use asynchronous initialization. Implementation of CvCameraViewListener interface allows you to add processing steps after frame grabbing from camera and before its rendering on screen.
-
onCameraFrame = callback function and it is called on retrieving frame from camera. The callback input is object of CvCameraViewFrame class that represents frame from camera.
-
Note
Do not save or use CvCameraViewFrame object out of onCameraFrame callback. This object does not have its own state and its behavior out of callback is unpredictable!
It has rgba() and gray() methods that allows to get frame as RGBA and one channel gray scale Mat respectively. It expects that onCameraFrame function returns RGBA frame that will be drawn on the screen.