|
||||||
|
Text and Source of Software version 1.5: CD-Morph by Patrik J. Burns
(cost: $40).
Created by: Gryphon Software Corporation.
Appeared in: Terminator, Michael Jackson's Black & White,
Robin Hood: Men in Tights, TV commercials
Idea: Given a set of images (a minimum of two), create an image sequence between each set of two images that have the illusion of morphing or evolving the first image in the set into the second.
Steps in Morphing
- Select a good set of images (at least two).
- Order each set of images by the order of the sequences you want to
appear in the final movie.
- For each sequence (image pair), select key points for the two images.
- Specify each sequence's options.
- Specify the morph movie's options.
Note: if time in class will demonstrate
Menu Bar
- File: Open, close, save images, create and manage movies
- Edit: Cut, Copy , Paste, Undo
- Sequence: Manage ad morph images in a Storyboard window
- View: Zoom in and out, Control display and color of key points and lines
- Movie: Control playback of a morph movie
- Windows: Hide and display various image windows.
Storyboard Window
Main document window in Morph. Contains original image pairs for each
sequence in the movie. The left image (left "thumbnail"-morph terminology)
is the first image in the sequence and the right image (thumbnail) is
the final/end image of that sequence. The first sequence will be on top
and have the number 1 for the sequence number in the bottom right-hand
corner of the thumbnail pair.
Start and End Image Window
Can display either start of end image of a sequence in their own windows.
Need to do this to add keypoints.
Morph Image Window
Pops up after you set up keypoints on start and end images of a sequence
and selected the Morphing option. Shows the morph produced for this sequence.
Tool Bar
- Adjusting Tool: Arrow icon, to move keypoints in the start and end image windows.
- Key Point Tool: Point Icon, To add a keypoint just point and click inside the Start image or End image to add one there. Another is added in the other image automatically as the matching keypoint. Use the arrow adjusting tool to move this matching one to the correct position.
- Line Tool: Line Icon, Adds a line between any two keypoints in the image. Only for use in making shapes, etc. easier to visualize how you are making the morph
- Scissors Tool: Scissors Icon, removes a line between two points.
- Magnifying Glass: Zoom in on an image.
- Hand Tool: move inside image (if zoomed).
- Resolution and Dimensions (#rows and # columns) must be the same. Resample (via Photoshop, etc.) or Rescan images if not of same
dimension.
- Input formats acceptable for Morph 1.5:
On Windows: JPEG, PICT, TGA, GIF, TIFF, BMP, PCX, DIB, DCX, WMF, WPG.
On Mac: PICT.
- Original images do not have to be represented by the same number
of color or greylevels. For example, can morph a color with a greyscale
image.
- Choose images where you can visualize in your head how the morph would work. Works best on sets of images which are similar in composition. For example frontal facial images of two different people work better (smother morphing) in general than say a front view of someone's face and a side view. Ofcourse quality is a great function of the keypoints selected.
Key Points
A Key Point = A point in the first image of the current sequence (pair
of images) that has a matching/corresponding point in the second image.
How Morphing Works?
The user sets up key points. The significance of the selecting a matching key point in the second image is basically you are saying that this is semantically the corresponding area that the first image's keypoint should evolve into. My guess is that morphing is achieved through a combination of averaging a neighborhood of greylevels surrounding the two corresponding key points over the number of in-between image frames you specify as well as moving these averaged neighborhoods over the line connecting the first image's key point location in the image plane and the final location of the matching keypoint in the second of the two original images. Unfortunately, as this is proprietary commercial software... we may never know exactly.
Steps to Create a Morph Movie in Morph 1.5
- Start Morph 1.5 application.
- Dump images for first sequence into the thumbnails of the storyboard
window. Double-click inside left thumbnail and using popped-up open
start image dialog box choose first image. Do the same for the right
thumbnail in the storyboard window for the ending image of this sequence.
(On Mac must be Pict- no compression format). Larger windows of these
images should pop up and if not visible you can select them from the
Windows menu. These are the windows in which you actually add the
keypoints.
- Add keypoints to first image (start image) by clicking the Key Point
tool to activate it and then clicking once for each keypoint you want
to create. Each time a matching keypoint is created in the second image
(end image) and you should move these points to their correct locations
by selecting the adjusting tool and inside the second image drag the
keypoint to the correct location.
Tip: you can select multiple keypoints to move at the same time as a group by: select Adjusting tool then using mouse in the window drag an outline around the keypoints you wish to include in the group. No you can drag them together.
- Save morph document: File->Save. Will pop up the Save Morph Document
dialog box. Suggest save as file.mrf.
- View/Create Morph (given done steps above):
for PC:
- Sequence->Morph (takes a few seconds).
Will create a Morph at 50% between the two
images. Note you can drag the slider bar on
top to view different percentage combos.
- Windows->Morph Image (will display an image with a slider bar on top),
- Adjust slider bar to percentage desired of mixture of first and second image of the sequence you want to produce a morphed image of.
- Sequence->Morph actually does the
morphing will take a few seconds
Note: to view another percentage of the
combination you must do the steps above
all over again for a Mac.
- Sequence->Morph (takes a few seconds).
Will create a Morph at 50% between the two
images. Note you can drag the slider bar on
top to view different percentage combos.
- Save as a Movie:
- Given you are still viewing your
Morph document that you just created
(otherwise open it up), Set the Sequence
Duration by adjusting sequence duration
display on the bottom of each sequences
thumbnail pair window (hours:minutes:seconds.fraction seconds).
The Movie duration is equal to the sum
total of the sequence durations.
- Choose a compressor: File->Compressor.
For PC:
choose whatever method, quality and Frames per second you wish.
For both Mac & PC resave document using.File->Save.
- Save the movie:
for PC:
File->Save Movie.
If Windows PC call it file.avi (need suffix!)
- Play the movie:
for PC:
File->Open Movie
- Given you are still viewing your
Morph document that you just created
(otherwise open it up), Set the Sequence
Duration by adjusting sequence duration
display on the bottom of each sequences
thumbnail pair window (hours:minutes:seconds.fraction seconds).
The Movie duration is equal to the sum
total of the sequence durations.
Line = connects two keypoints in a morph image.
Can only use to help visualize the keypoints and how the resultant
morph movie will look.
Create a Line
1) Click the Line Tool.
2) Point at the first keypoint of the line and click once.
3) Point at second keypoint and click once. Line is drawn.
4) To connect a second keypoint to a third point at the third point and
click once.
Tip: To connect keypoints with lines as you add them to an image, activate the Key Point tool, then hold down the
Cntrl key for Windows PCs and Option key for Macs before you start clicking in the image to add keypoints.
1) Can Change Key Point and Line Colors:
View->Set Colors
2) Keypoint selection:
- Select image features that are common or you want to morph into each other and surround with keypoints in the two images.
- Provide enough keypoints.
- Use Magnify tool to help correctly place keypoints.
3) Image Selection:
Select images with similar backgrounds and foregrounds if possible.
4) Save Morph Image:
Must save after you morphed it and given that it is the active window by:
for PC: File->Save Image
for Mac: File-> Export Image
5) Print Morph Image:
Save it using step 5 above and read into a program
like Photoshop and do a File->Print
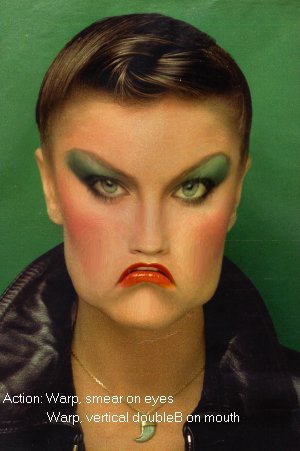
6) Improving Morphs:
- If ghostly image, add more keypoints.
- If convoluted image is created, matching keypoints not in correct location... look for this near distortion.
1) Given you are viewing the Morph Document with at least one sequence
in it (see steps before on how to create a morph movie/document). Otherwise
open it up.
2) Sequence->Add Sequence : appends another thumbnail pair to the
bottom of the image sequences in the Storyboard window.
Note: current sequence is the one with the pushed in appearance.
Duplicating Sequences:
- Storyboard window should be active.
- for PC: Sequence->Duplicate Sequence
for Macs: Sequence->Duplicate
- Increase window size until you can see the added sequence.
Reordering Sequences:
See Sequence->Bring To Top, Send To Bottom,
Changing How things Morph: Tension
Tension = setting that lets you control for each keypoint
the individual pixel and color contributions
made by the first or second image of the
sequence in question in the output morphed image.
Color Tension and Position Tension Slider Bars:
1) Select Adjusting Tool
2) For Windows hold down Cntrl Key and
and click on desired keypoint. For Mac
instead hold down the Option Key and
click on desired keypoint.
Number of Control Tension Bar, n = this says that use n% of the color or position info from the second image and (100-n)% of the color or position info from the first image in the sequence. Thus, the larger n, the more the second image contributes to the output morph image. Default for keypoints is 50%.