Designing Your application ---some suggested steps for this class
STEP 1: create some use case(s) and from these define your beginning interfaces
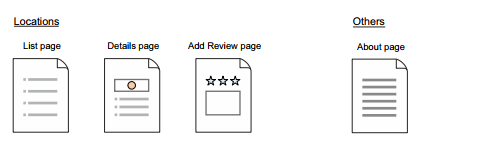
consider the example from the book Getting MEAN --have a Loc8r app that you have the following interfaces. The Loc8r app shows information about places and lets users leave reviews
NOTE: in step XXXX you will actually create a view for each interface
STEP 2: for views in step 1 define URI mappings
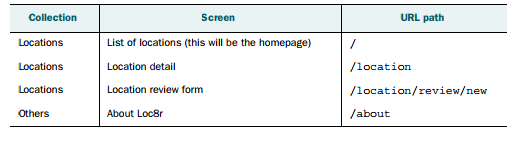
for each interface in your design in step 1 do a mapping of URIs...for our example from the Getting MEAN book
Notice that we have started to group the interfaces by their purpose --we have a set that deal with locations (the places) and another set that is kind of miscelaneous
NOTE: you will often start with a design that needs to be revised because it does not have all the interfaces or functionality you need and you will need to repeat these steps for any new interfaces.
STEP 3: for each URI add the logic to a router file to map to appropriate controller
for each URI from step 2
for the Getting MEAN example this would mean
Collection Purpose URI router file Controller & method name Locations homepage, list of locations / index.js locations.js and to the main method Locations a location detail /location index.js locations.js and the location method Locations Location review form /location/review/new index.js locations.js and the newreview method Others About Loc8r /about index.js others.js and the about method
NOTE: having one controller for a "collection" of interfaces makes sense, where you have different methods for each unique functionality (or URI extended path)
//******the router file index.js

var express = require('express');
var router = express.Router();
var ctrlLocations = require('../controllers/locations');
var ctrlOthers = require('../controllers/others');


/* Locations pages */
router.get('/', ctrlLocations.homelist);
router.get('/location', ctrlLocations.locationInfo);
router.get('/location/review/new', ctrlLocations.addReview);

/* Other pages */
router.get('/about', ctrlOthers.about);

module.exports = router;
STEP 4: for each Controller (and its methods) defined in step 3 ---create them
for each Controller and its lists of methods from step 3, create the code
What is in a controller - calls to business logic and possibly data and typically at the end there is a rendering of a view
a simple "static" controller simply renders a dummy view passing no data or only hard coded data--- lets look at this
};
a slightly more complex controller that retrieves data and passes it to a view for rendering would have an outline like the following (this is NOT complete code but, gives you the idea of the flow)
};
STEP 5: for each view defined in step 1 ---create them
this is where you will typically create a template either in EJS or Jade/Pug or whatever template engine you choose when setting up your NodeJS +Express project. You may have choosen to use additional packages/frameworks like Bootstrap, etc. Good design of an interface is covered elsewhere --this is just discussing the steps.
STEP *: after each step 3-5 run, debug, test and deploy your application code
For example, you may be using WebStorm IDE and you can locally run, debug and test as well as deploy to Heroku server for remote deployment. At the same time you can use Git from WebStorm IDE to do software management.
